Workshop with Taiga Urushibata at British Shohin Bonsai

dsc_0302_mod

During the British Shohin Bonsai exhibition at RHS Wisley Gardens in the south of England that was hosted by Sutton Bonsai society I attended workshop led by Taiga Urushibata. So much time can be wasted at workshops simply wiring your tree, so I pre-wired my pine before the workshop, I also took along another pine to work if time allowed.

I could easily have styled this tree but I wanted Taiga’s ‘take’ on the tree, there were so many option available… what was his idea for the tree, how would he style it? I believe that you are never to old to learn no matter how many years you have been working with bonsai.

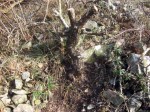
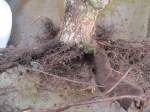
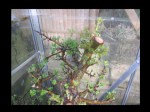
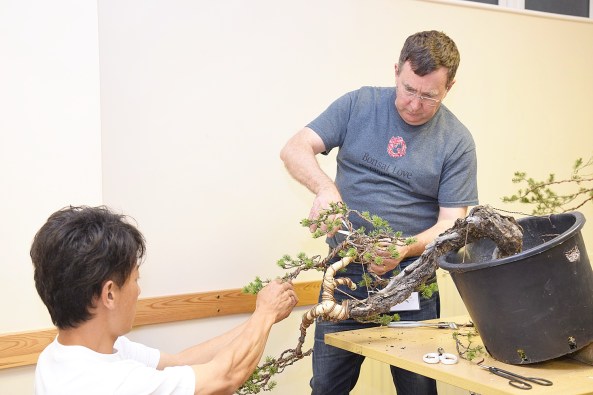
The tree is a ‘natural’ cascade as the base of the tree has a sharp bend bringing the trunk more than 90º also the base and nebari are very interesting displaying deadwood and deep fissured bark. There is a VERY old shari running almost the length of the sweeping curve trunk.

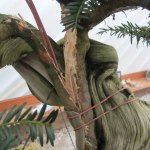
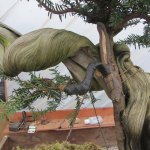
After a short discussion Taiga agreed that this was the best option and the styling began. I wanted to bring the crown of the tree closer to the base, this meant a very severe bend. The tree had raffia in the area to be bend. Taiga told me that such a bend was not safe however I was confident that it was OK as the tree was strong and Scots Pine are very flexible. A tourniquet was applied to a temporary steel bar; this tourniquet was later replaced with a shorter one attached to a dead branch nearer the base of the tree. Taiga expressed that a bend such as this would not be possible with a Japanese Red pine as the branch would snap in two.

The final design was more or less as I envisaged. The other trees worked by Taiga included a few Junipers, a Yew and pines.


Improving the success rate of Yamadori

I have been using this technique now for over ten years and I have finally decided to share what I have learned. The technique is known as ‘sweating’ and is used extensively in arboretorial circles. I use for the following species: Cratageus, Prunus, and most of the Rosaceae family, do not use on evergreen species.

I collect trees with as much root as possible, but I have put roots on trees that have not had any.

Follow this procedure and your success rate in establishing your freshly collected yamadori will improve immeasurably.

  1. Collect as much root as possible
  2. Clear as much mountain soil but do not wash the roots
  3. Use the soil mix as shown below
  4. Clean cut the major roots as close to the trunk without spoiling the nebari
  5. Place the tree in the smallest container possible
  6. Ensure that the tree is well packed in the container
  7. Wire the tree securely in the pot
  8. Make sure that the cut branches are clean and NOT SEALED
  9. Saturate the soil
  10. Pile fresh sphagnum moss on the surface of the container
  11. Wrap the whole tree in a VERY large black plastic bag
  12. Place in a sunny position as the tree MUST GET HOT
  13. Humidity in the bag must be high at all times, mist spray daily
  14. After two or three weeks new buds will appear particularly around the cuts
  15. Ensure that they do not touch the sides of the bag.
  16. When the new shoots reach 5cm or 2” remove from the bag and protect from cold and wind, mist spray daily and keep out of direct sunlight.
  17. Keep watch for the new shoots hardening off, then you can feed with a very diluted solution; do not work the tree for the first 12 months.

Good luck, please do not copy these photos or the text, and share the link freely.

Creating a Terracotta Succulent planting

final planting

Creating a New Branch by splitting and repositioning on a Yew.

Yew Tanuki 1

I have been developing this Tanuki over the last six years and the live is thickening up well although it has many years of growth before I would consider this a ‘convincing’ bonsai. The host tree is a piece of Yew I collected on my travels and the ‘scion’ is also Yew, the perfect match!

Fitting the scion to the host was done via a ‘keyhole’ groove and the Yew whip inserted; it has grown out and is firmly attached.

The tree has been growing well however there was a very straight section that was disturbing to the eye; also all the foliage was at the top of the tree, I needed a lower branch! The solution was to split a branch away and strip it down the trunk creating a Shari, adding interest to the ‘boring’ section.

This was done using a small branch splitter working my way from the top down to the lower part. To ensure that the split section did not break away I secured a small piece of hose with wire this also held in place two copper wires that were fitted along the length of the split that would help keep the thin section from damage during bending.

The whole section was then tightly wrapped with wet raffia and then self-amalgamating black tape. Carefully bending and twisting I positioned the ‘new’ branch into position under the deadwood. All the exposed edges of live were then covered with cut paste to help callusing and to stop infection.

Repotting the Excalibur Yew

The stone and the tree were collected together; I had no option as the tree grew through the stone. I carried the tree for just under a mile down the mountain to my vehicle… it is very heavy and I collected no more that day as I was truly knackered. I have done some work on the right side of the stone as I wanted to expose some more of the trunk line, this has now weathered and is indistinguishable from the rest of the stone. The combination were collected in 2009 and the tree has thrived over the last few years, even though the tree is very slow growing the canopy is developing well and should become a pleasing bonsai in time, a dwarf rhododendron is planted at the front to break up the ‘wall’ of stone. .

How the tree looked when first collected

How the tree looked when first collected

with a little temple just for fun!

with a little temple just for fun!